Developing PC applications on the Mac is great, contrary to what some believe. I too was once in the ‘build-on-the-platform-you-target’ camp. Forget that horse-puckie and get efficient:
- Get VMware Fusion: http://www.vmware.com/products/fusion/.
- Make sure you’ve got XCode. This will be sixty percent of your development environment and you’ll be coding in OS X.
- Install Windows XP or Vista, your choice, as a new VM in Fusion. This will be the other forty percent of your development environment where you’ll step code and delve out builds. Don’t set it up with more than 40% of your Mac’s RAM assigned (preferably 25%).
- Install your development tools on this Windows instance, probably .NET 2005.
- Set up a shared folder for your source code between your Mac user folder and the dev VM. Make it read-write by both systems (a setting in Fusion).
- Set up more VMs in Fusion. These are your Test VMs (smaller, fast Windows instances used as QA machines) – as of this writing you should make XP Home, XP Pro, Vista Home, and Vista Ultimate VMs. You may want additional setups depending on your apps needs (administrator settings, etc). Set these up with 25% or less of your available RAM.
- Do nothing… I’m waiting for you to finish step 6… It takes a while.
- Run Windows Update (if desired) and take Snapshots of each VM (Command+T) after they’re set up. These Snapshots will let you revert to a clean state any time you wish.
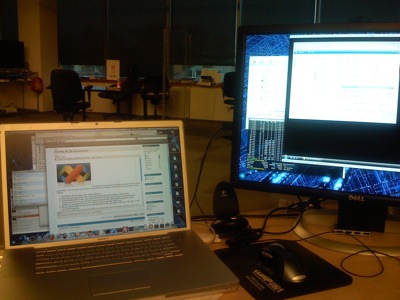
 Great, now you’re hooked up and can get your code on. With XCode you can utilize all your monitors (if you’re a developer using less than 2 monitors, we need to talk…). You’ll have XCode running with your source code
 all over the place organized how you like it. You’ll have your development VM running in a corner.
Use XCode as the code editor (you’ve got your source files saved on the Mac, in the shared folder). Keep the development VM running and hit Control+B in it (or better yet, add an AppleScript to XCode to pass Control+B to the VM) when you need a new build. You can step through the code when you need to.
When you’re ready to test your app(s) on all flavors of Windows, launch up the various VMs and install the app(s). Afterwards, restore to the Snapshot you took before. You’re starting from a nice clean start every time.
Great post Sol! I blogged it and sent a trackback. Very cool of you to share.
I’ve tried this workflow, but Visual Studio (both 2005 and 2008) seem very unhappy about building projects that are located in Shared Folders… I tend to get lots of bogus error messages that render it unusable. Is there a trick to avoiding this?
I ran in to this too. Running the development environment under alternate credentials resolved this.
Also check Steve St. John’s post which describes running SUBST.EXE as a solution.
Hey Sol, thanks for the response, but I don’t understand what you mean by “alternate credentials” in this case.
Steve St. John’s post doesn’t seem relevant to what I’m doing.
Steve St. John’s post describes a situation where you’re getting build errors because of credentials. This seems to be the case when building a project from a shared location.
The idea is that files from that share are actually set to SYSTEM level permissions. This is why you get the build errors, but it probably doesn’t seem like it. By running the SUBST.EXE, you alter the permissions your system has given to the project so that they’re your own permissions instead of your local SYSTEM’s.
I tried using SUBST.EXE but it made no difference. I usually get errors when attempting to create .idb files.
VMware Workstation lets you debug directly on your test VMs using Visual Studio or Eclipse.
But it is not yet available on the Mac : (
thanks for the post